Tuesday, March 29, 2011

Sea Shell Metal Clay (Muschel Art Clay)

Sea shell metal clay with freshwater pearl and sterling silver wire.
Muschel art clay mit Süßwasserperle und 925er Draht.


Thanks for looking ;-)
Danke für deine Interesse :-)


xx Dian

YOJ11 Week 13 - Ina Pendant (Ina Anhänger)

Continuing Water Edge's Earrings.... here is the second  Water Edge's Pendant.
Ich habe meine Water Edge's Ohrringe weiter gearbeitet... hier ist die zweite Water Edge's Anhänger.
Sterling silver wire, swarovski siam and SS balls.
925er Draht, Swarovski Siam und 925er Kugeln.

Sunday, March 27, 2011

YOJ11 Week 12 - 11,8" Ring

Theme is 'Made with Two Feet of Wire'. Lets step into a new challenge.
Das Thema ist 'Hergestellt aus 61cm Draht'. Lass uns ins neue Herausforderung treten.
I divided a 30cm (11,8") wires to 3 part. Each 10cm.
Ich teilte ein 30cm Draht mich zu 3 Teilen. Jedes 10cm.
Took 2 wires as the base and use the rest to wrapped the base. Made a ring and flimsy curly swirls. Such a nice free style ring ;-)
Nahm 2 Drähte als Basis und der Rest wickelte die Basis. Ein Ring mit lockig Wirbel. Sehr schöne 'free style' Ring.
In the end I put glass bead, and the ring is ready.
Am Ende hängt eine grüne glass Perle, der  Ring ist fertig.
This time, I have William's cuttest hand as model..... he is okay with it.
Diesmal, William's hand als model. Er hat kein Problem damit.

xx Dian

Thursday, March 24, 2011

YOJ11 Week 11 - Come Into The Light (Komm Ins Licht)

Butterfly stamped on metal clay. Oxidized and voila..... it flies to you :-)
Ein Schmetterling auf metal clay gestempelt. Oxidiert und voila.... er fliegt zu Dir :-)

YOJ11 Week 10 - Interchangeable Earrings

Easy studs earrings. And I can change the beads !

Saturday, March 19, 2011

Pendant Project 2

Hello again,
here are some pics of sanding and firing metal clay.
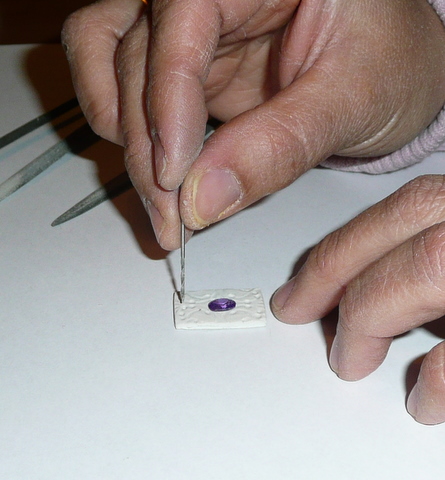
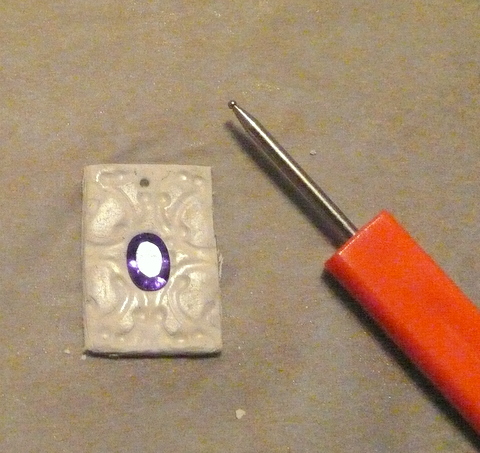
I use small bits and drill by hand, a hole in dry bone clay. Using gentle pressure, turn the bits round and round so the point drills into the clay until it goes right through. Be careful it is very fragile.
  Make it bigger with bigger bits or, as you see, I have round files. Drill slwoly with the point.
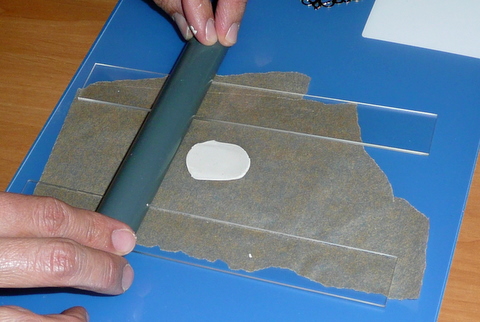
Now is the most important part, sanding and finishing. Refines the edges with sand paper, needle files. Sand the surface fine too. It is much easier to finish bone dry clay than fully metal, so it is worth spending extra time to perfect the finish at this tage.
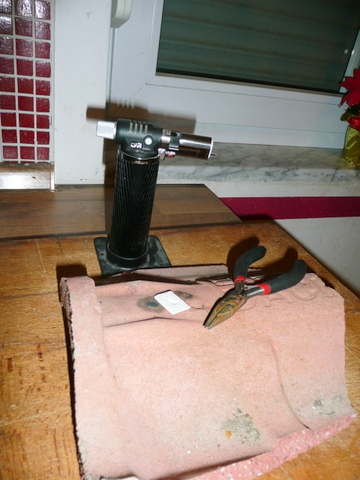
I don't have killn. That's why I took Low Fire Art Clay, can be fired with Torch.
Set the clay on a heatable tile or something fireproof surface. Turn the light off, important to see when you stop firing.  Light the torch, point it towards to the clay about 3/4" from the work. While holding the flame, move the torch slowly around in circular motion. Heating it until it starts to glow red. Continue heating til it becomes a bright and luminous color. Hold this color for 2 minutes, if it starts to bubble pull the flame away. It means you are too close. When the time is up, turn off the flame and allow the clay to cool.
Once the clay has been fired, you'll find the surface is white color. Take it under water and rub with messing brush. The silver color comes out soon. Bring it out from water and use some polishing paper to have more shine and bright. I started with 400-grit, 600 then 1200-grit. In the end you can use polishing cloth for mirror finish surface.
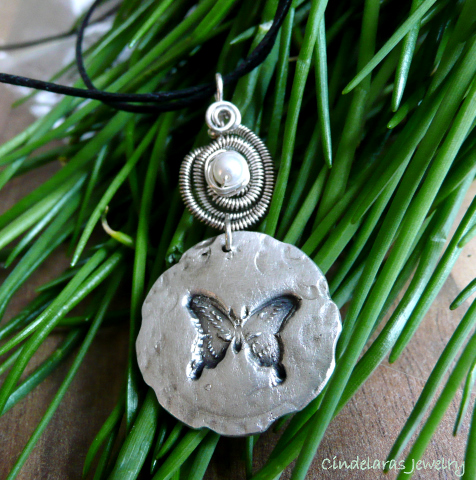
I hope I give you a bit clue, how fun playing with metal clay. Some good links to learn metal clay: www.metalclayacademy.com
www.cooltool.us
www.metalclayguru.com
www.wholelottawhimpsy.com

xx Dian

Sunday, March 6, 2011

Pendant Project 1

My promise to make 'how-to' Art Clay piece. This step-by-step pictures are not detail and clean, sorry. Next time I'll search 'more' hands and do my best to give you better information.
For this project I use Art Clay Silver Low Fire.
Make sure your hands and all the tools have somekind of cooking oil or olive oil to prevent sticking. Roll down your clay 2 cards thick. Here I use 2 plastic rulers as cards. 
Apply texture you like and use kraft knife to make small rectangle. 
A spacer as my texture. I pushed a cubic zirconia in the middle, not sure if my clay is high enough to capture the stone. We will find out as I fire it :o)  Actually, I need to syring on the small dollop of clay and push the stone in. So, finger crossed that my nice zirconia not jumping out..
 There are many methods of making holes in your clay. Punch the hole with simple drinking straw, a pin tool, or a hand drill. Wet clay is easier to work, as you see my pendant. And don't forget the shrinkage fired clay, so make the hole slighty larger.

Time to let it dry. Hair dryer needs 10-20 mins, natural dry needs 24 hours at room temperature. See you tomorrow... with sanding and firing the clay.

xx Dian

YOJ11 Week 9 - Pearl & Clay (Süßwasserperle & Clay)

Sweet and simple... tiny bity clay with beautiful freshwater coin pearl.
Süß und einfach..... kleine Clay mit wunderschöne Münze Süßwasserperle.
The clay measures 8mm x 1,2cm. Under the clay are keshi pearls.
Der viereckige Clay ist 8mm x 1,2cm groß. Unten hängt die Keishi Süßwasserperle.